


In This Tutorial We Will Discuss You How To Configure Our Laravel Applications
To Send Emails Using Your Gmail Account As Gmail
SMTP Server With The Default Laravel SMTP Configurations.
The Benefits Of Using SMTP Server Cannot Be Over Emphasized, With An SMTP Server We Can
Send Email From Our Local Server. Thus, Giving Us The Ability To Test The Email Functionality On
The Local Server Itself. Mails Sent Via SMTP Are Not Flagged As SPAM By Gmail As
Seen In Mails Sent Using The PHP Default Mail() Function.
Step 1: Configure Gmail SMTP Server In Laravel Application
Laravel Uses Config/Mail.Php File For Storing Details Used In Mail Sending.
This File Contains Settings Like MAIL_DRIVER, MAIL_HOST, MAIL_PORT, Etc.
In Order To Successfully Send An Email, We Need To Provide These Information.
To Add These Required Information, We Need Not Edit This Config/Mail.Php File,
Rather We Would Supply These Details Accordingly In The .Env File.
Thus, Open Your .Env File Which Is Located In Your Root Directory Of Our
Application And Checkout For This Settings:
					MAIL_DRIVER=smtp
MAIL_HOST=mailtrap.io
MAIL_PORT=2525
MAIL_USERNAME=null
MAIL_PASSWORD=null
MAIL_ENCRYPTION=null
Now Edit The Details Above As Follows.
					MAIL_DRIVER=smtp
MAIL_HOST=smtp.googlemail.com
MAIL_PORT=465
MAIL_USERNAME=ENTER_YOUR_EMAIL_ADDRESS(GMAIL)
MAIL_PASSWORD=ENTER_YOUR_GMAIL_PASSWORD
MAIL_ENCRYPTION=ssl
In The Above Settings , We Configured MAIL_DRIVER As Smtp, MAIL_HOST For
Gmail As Smtp.Googlemail.Com, MAIL_ PORT For Gmail As 465 And MAIL_ENCRYPTION
Method As Ssl.
The MAIL_USERNAME And PASSWORD Should Be Replaced With Your Gmail Email
Address And Password Respectively.
Since We Are Using Gmail SMTP, We Need To Change Some Security Settings On
Our Google Account, To Give Access To Less Secured Applications.
Step 2: Configure Your Google Account
Login To Your Google Email Account And Click On Google Account Button.
This Button Is Display When You Click On The Profile Picture In Your Gmail
Dashboard As Shown.

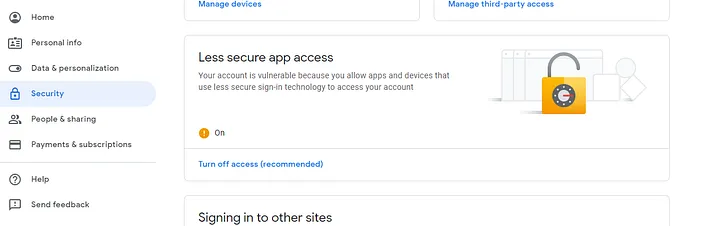
Once You Are On My Account Page Then Click On Security And Scroll Down To The Bottom
And You Will Find ‘Less Secure App Access’ Settings. Click On The Radio Button To Set It ON.
Step 3: Send Emails From Your Laravel Application
At This Point, All The Basic Setup Has Been Completed. We Can Now Write Some
Laravel PHP Codes To Send An Email.
To Get Started, Create Any Controller Of Choice Where The Mail Sending Logic
Will Be Handled, Then In This Controller Write Your Codes Using The Code Snippet Below
As A Guide.
					$to_name = ‘RECEIVER_NAME’;
$to_email = ‘RECEIVER_EMAIL_ADDRESS’;
$data = array(‘name’=>”Ogbonna Vitalis(sender_name)”, “body” => “A test mail”);
Mail::send(‘emails.mail’, $data, function($message) use ($to_name, $to_email) {
$message->to($to_email, $to_name)
->subject(Laravel Test Mail’);
$message->from(‘SENDER_EMAIL_ADDRESS’,’Test Mail’);
});
In The Above Code, We Are Using Our Mail Template As ’Emails.Mail’ File .
Hence We Need To Create An ‘Emails’ Folder And The Mail.Blade.Php File
At Resources \Views\Emails\Mail.Blade.Php
Our Test Mail Template Mail.Blade.Php Should Just Contains A Few Test Codes As Shown Below.
					Hello <strong>{{ $name }}</strong>,
<p>{{body}}</p>
Hurray, We Are Done, Simply Create Any Route Of Your Choice To And Start
Sending Mails From Your Laravel Application.
To Get Started, We Follow The Following Simple Steps:
Require a solution to your software problems?
Want to get in touch?
Have an idea?